Table of Contents
Chapter 1 – Introduction
Chapter 2 – Understanding the Problem
Chapter 3 – What is HAProxy?
Chapter 4 – Why Aren’t We Using an AWS Application Load Balancer?
Chapter 5 – Understanding the Architecture
Chapter 6 – Before We Launch Our First EC2 Instance
Chapter 7 – Teaching Every Future Server What To Do
Chapter 8 – Great! Our Servers Can Scale… But Who Updates HAProxy?
Chapter 9 – We Need a Better Way Than SSH
Chapter 10 – Giving Our Infrastructure a Brain
Chapter 11 – The Final Piece: Connecting Everything with EventBridge
Chapter 12 – Let’s Test Our Automation
Chapter 13 – Common Problems and How to Troubleshoot Them
Chapter 14 – How Would We Improve This for Production?
Chapter 15 – How to Showcase This Project
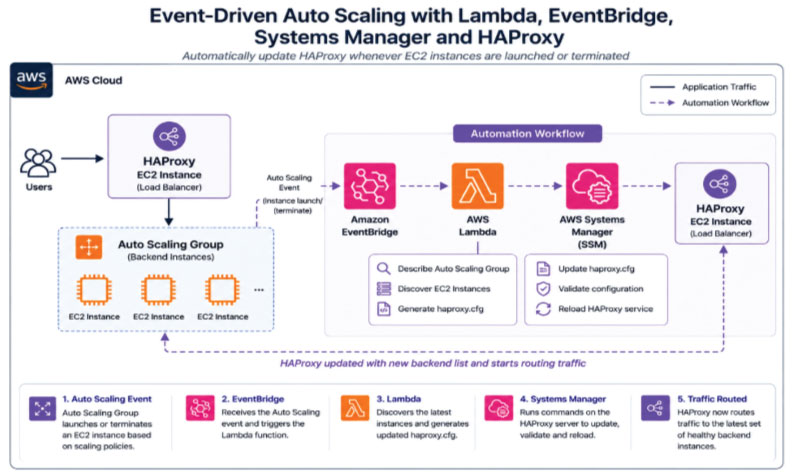
In this hands-on AWS project, we’ll build an event-driven automation workflow using Auto Scaling Groups, Lambda, EventBridge, AWS Systems Manager (SSM) and HAProxy to automatically update backend servers whenever your infrastructure scales.
Chapter 1 - Introduction
If you’ve been learning AWS for some time, there’s a good chance you’ve already built the classic Lambda project. Someone uploads a file to an S3 bucket, Lambda gets triggered automatically, and it prints a message or resizes an image. It’s a great exercise because it helps us understand how serverless computing and event-driven architecture work.
But after that, many learners start asking the same question.
"How are these AWS services actually used in real projects?"
This is one of the most common questions we receive from our DevOps learners. Learning individual AWS services is important, but understanding how they work together to solve a real business problem is what takes your skills to the next level.
If you’re looking for a practical AWS project that you can confidently add to your resume, explain during interviews, showcase on LinkedIn, or even demonstrate as a Proof of Concept to your team, then you’re in the right place.
In this guide, we are not going to build another basic Lambda demo. Instead, we’re going to solve a problem that many DevOps engineers eventually face when working with self-managed infrastructure.
Imagine your application is running behind HAProxy on an EC2 instance. Your backend application servers are part of an Auto Scaling Group, which means AWS can automatically launch or terminate servers based on traffic. Auto Scaling does its job perfectly, but there’s one problem—it doesn’t automatically tell HAProxy about those newly launched servers.
That means new instances are available, healthy, and ready to receive traffic, but HAProxy continues sending requests only to the old backend servers because its configuration hasn’t been updated.
Wouldn’t it be better if this entire process happened automatically?
That’s exactly what we’re going to build.
By the time you finish this guide, you’ll have a complete event-driven automation project that combines Auto Scaling Groups, EventBridge, Lambda, Systems Manager (SSM), IAM and HAProxy into one seamless workflow. More importantly, you’ll understand why each service is part of the architecture instead of simply following configuration steps.
Throughout this guide, we’ll explain not only how to configure each AWS service but also why we’re configuring it that way, where beginners usually make mistakes, and how to troubleshoot common issues. Our goal is that by the end of this project, you don’t just have a working setup, you understand the engineering decisions behind it.
Prerequisites
Before we start building this project, make sure you have the following:
- An AWS account
- Basic understanding of EC2 and IAM
- An SSH Key Pair
- Basic Linux command-line knowledge
- Around 45–60 minutes to complete the entire project
Do I Need to Pay for AWS?
If you’re using the AWS Free Tier, you should be able to complete most of this project without any additional cost.
We’ll mainly use services such as EC2, Auto Scaling, Lambda, EventBridge, IAM and Systems Manager. Most of the resources used in this guide either fall under the AWS Free Tier or incur only minimal charges for a short demonstration.
If your AWS Free Tier has already expired, don’t worry. As long as you delete all the resources after completing the project, the overall cost should be very small, typically just a few cents to a couple of dollars depending on your AWS Region and usage.
We’ll also show you how to clean up all the resources at the end of the guide so that you don’t leave anything running accidentally.
Chapter 2 - Understanding the Problem
Before we start creating AWS resources, let’s first understand the problem we’re trying to solve.
Imagine you’re working as a DevOps engineer for an e-commerce company. The application is hosted on multiple EC2 instances, but customers don’t connect to those servers directly. Instead, every request first reaches a HAProxy server, which acts as the single entry point for the application. From there, HAProxy distributes incoming traffic across multiple backend servers.
Everything works perfectly during normal traffic.
Now imagine a sale starts and thousands of users begin visiting the website. CPU utilization increases, and as expected, the Auto Scaling Group launches another EC2 instance to handle the additional load.
At first glance, it seems like the problem has already been solved. AWS has automatically created another application server, and the application is running successfully on that new instance.
But if we look a little closer, we’ll notice something interesting.
HAProxy still has no idea that the new server exists.
Its configuration file still contains only the old backend servers, which means every incoming request continues to be forwarded to the existing instances while the newly launched server sits idle. Auto Scaling has increased the infrastructure capacity, but because the load balancer hasn’t been updated, users never benefit from that additional server.
The traditional solution is simple but far from ideal. Every time Auto Scaling launches or terminates an instance, someone logs in to the HAProxy server using SSH, edits the haproxy.cfg file, adds or removes backend servers, saves the configuration and reloads the HAProxy service.
That approach works.
But it isn’t automation.
If your infrastructure scales several times a day, repeating the same manual steps quickly becomes time-consuming and error-prone.
Instead of asking engineers to update HAProxy manually, why not allow AWS to perform the entire process automatically?
That’s exactly what we’re going to build in this project.
Whenever Auto Scaling launches or terminates an EC2 instance, AWS will detect the event, generate a new HAProxy configuration and update the server automatically without anyone logging in to the machine.
This is the kind of automation that makes DevOps so powerful.
Chapter 3 - What is HAProxy?
Before we continue, let’s spend a few minutes understanding HAProxy because many people are familiar with AWS Application Load Balancers but haven’t worked with HAProxy before.
The easiest way to understand HAProxy is through a simple example.
Imagine you’re visiting a busy restaurant with five chefs working in the kitchen. As a customer, you don’t know which chef is currently available to prepare your order, and honestly, you shouldn’t have to.
Instead, there’s a manager standing at the entrance. Every customer first speaks to the manager, who looks at the workload of each chef and decides where the next order should go. If one chef is already busy, the manager sends the customer to another chef. If one chef leaves the kitchen, customers are automatically directed to the remaining chefs without even noticing the change.
HAProxy works in almost the same way.
Instead of customers, it receives HTTP requests. Instead of chefs, it has multiple backend application servers. Every request first reaches HAProxy, which decides which backend server should handle it. The client doesn’t need to know how many servers are running, which server is currently busy, or whether one of them has failed. HAProxy makes those decisions automatically.
This is why HAProxy is called both a reverse proxy and a load balancer.
As a reverse proxy, it becomes the single entry point for your application, hiding the backend servers from users. As a load balancer, it distributes requests across multiple backend servers, helping us improve performance, availability and scalability.
HAProxy is also much more than a simple traffic distributor. It can continuously monitor backend servers using health checks, stop sending traffic to unhealthy instances, terminate SSL certificates, redirect HTTP requests to HTTPS, perform URL-based routing and apply various traffic management rules.
One of the biggest advantages of HAProxy is that it isn’t tied to AWS. The same configuration can run on AWS, Azure, Google Cloud or even an on-premises data center. That’s one of the reasons many organizations continue using HAProxy even after migrating workloads to the cloud.
During our DevOps classes, learners often ask whether it’s still worth learning HAProxy when AWS already provides Application Load Balancers. Our answer is always the same.
Understanding managed AWS services is important, but understanding self-managed solutions like HAProxy gives you a much broader perspective. Many companies still rely on HAProxy because of legacy applications, hybrid cloud environments or specific customization requirements that have evolved over the years.
Chapter 4 - Why Aren't We Using an AWS Application Load Balancer?
This is probably the first question many readers will have, and it’s a good one.
AWS already provides Application Load Balancers that integrate beautifully with Auto Scaling Groups. They automatically discover backend instances, perform health checks and distribute traffic without requiring us to manage a separate server.
So why are we building this project with HAProxy?
The answer is simple.
Because this isn’t just a project about load balancing.
It’s a project about automation.
Many organizations already have HAProxy running in production because their applications were originally deployed on physical servers or virtual machines long before they moved to AWS. Others operate hybrid environments where part of the infrastructure still runs on-premises while another part runs in the cloud. In these situations, replacing HAProxy with an Application Load Balancer isn’t always practical or even necessary.
There is another reason that often comes up during discussions around infrastructure design, cost.
For production applications handling internet traffic, an AWS Application Load Balancer is usually the recommended solution because AWS manages availability, scaling and maintenance for you. However, if you’re building a Proof of Concept, running a temporary development environment or experimenting with automation in your own AWS account, you may already have an EC2 instance available. Running HAProxy on that instance can be a reasonable option without introducing another managed service.
The important takeaway is not that HAProxy is always cheaper or better than an Application Load Balancer.
The important takeaway is understanding the trade-offs and knowing how to automate infrastructure regardless of which reverse proxy your organization uses.
Once you understand the architecture in this guide, you can apply the same event-driven automation pattern to NGINX, Apache Traffic Server, Envoy Proxy or many other reverse proxies.
Chapter 5 - Understanding the Architecture
Now that we understand the problem, let’s look at the solution before we start building it.
At first glance, the architecture might seem like it contains many AWS services. The good news is that every service has a very specific responsibility, and once we understand that responsibility, the entire workflow becomes surprisingly simple.
Everything begins with the Auto Scaling Group. Its only responsibility is to monitor application demand and launch or terminate EC2 instances whenever additional capacity is required. It doesn’t know anything about HAProxy or how traffic is being distributed. Its job ends once the infrastructure has been created successfully.
This is where EventBridge enters the picture.
Amazon EventBridge automatically receives Auto Scaling events published by AWS and forwards matching events to Lambda. When Auto Scaling successfully launches or terminates an EC2 instance, EventBridge immediately detects that event and forwards it to the next service in our architecture. You can think of EventBridge as the messenger. It doesn’t modify infrastructure or execute commands. Its responsibility is simply to notify other AWS services whenever something important happens.
The next service is Lambda, and this is where the real automation begins.
When Lambda receives the Auto Scaling event, it queries the Auto Scaling Group, discovers every running EC2 instance and collects their private IP addresses. Using those IP addresses, it dynamically generates a brand-new HAProxy configuration file that contains the latest backend servers.
At this point, many beginners ask an interesting question during our training sessions.
“If Lambda has generated the configuration file, how does it actually copy that file to another EC2 instance?”
Our first instinct might be to use SSH, but that immediately creates additional challenges. We need SSH keys, network connectivity, security group rules and credential management.
Instead, we’ll use AWS Systems Manager.
Systems Manager allows Lambda to execute shell commands securely on the HAProxy server using IAM permissions. There’s no need to open SSH access or manage private keys. Lambda simply asks Systems Manager to execute a few commands on the EC2 instance, and Systems Manager takes care of the rest.
Finally, HAProxy receives the updated configuration, validates it and reloads the service. Within a few seconds, the newly launched EC2 instance starts receiving application traffic automatically.
This is one of our favourite demonstrations during DevOps training because it brings together multiple AWS services into a single real-world workflow. Instead of learning Auto Scaling, EventBridge, Lambda and Systems Manager as isolated topics, we get to see how each service solves one small part of a much bigger engineering problem. By the end of this guide, you’ll not only have a working project but also a much deeper understanding of how event-driven automation is implemented in AWS.
Chapter 6 - Before We Launch Our First EC2 Instance
Now that we understand the overall architecture, it’s time to prepare our AWS environment.
It might be tempting to launch an EC2 instance immediately, but just like we don’t start building a house before preparing the foundation, we shouldn’t start creating servers before setting up the networking and security around them.
Spending a few extra minutes here will save us a lot of troubleshooting later.
For this project, we’ll use a single VPC.
Since users will access our application through HAProxy, the HAProxy server needs a public IP address. That means we’ll launch it inside a public subnet.
What about our backend application servers?
In a production environment, backend servers are usually placed inside private subnets so that they aren’t directly accessible from the internet. Only the load balancer communicates with them. That’s considered a best practice because it reduces the attack surface and improves security.
However, this guide is focused on understanding event-driven automation rather than VPC networking. Introducing private subnets, NAT Gateways and additional routing at this stage would make the project much more complicated than it needs to be.
To keep the learning experience simple, we’ll place both the HAProxy server and the backend application servers inside a public subnet. Once you understand the complete automation workflow, moving the backend servers to private subnets becomes a straightforward improvement.
The next thing we need is Security Groups.
If you’re new to AWS, think of a Security Group as a virtual firewall attached directly to an EC2 instance. Every request reaching the server must pass through the Security Group first. If the rule allows the traffic, the request continues. Otherwise, AWS blocks it before it even reaches the operating system.
We’ll create two Security Groups for this project.
The first Security Group will be attached to our HAProxy server. Since users will access the application through HAProxy, allow inbound traffic on port 80 from Anywhere (0.0.0.0/0). If you plan to connect to the server using SSH during the setup, also allow port 22, preferably only from your own public IP address instead of opening it to everyone.
The second Security Group will be attached to our backend application servers.
Unlike HAProxy, these servers don’t need to be accessible directly from the internet because users will never communicate with them. Instead, allow inbound traffic on port 80 only from the HAProxy Security Group.
This small configuration is something we always emphasize during our DevOps classes.
Many beginners simply allow port 80 from anywhere because it makes testing easier. While the application will certainly work, it’s not how we should design real infrastructure. If HAProxy is the only component communicating with the backend servers, then only HAProxy should be allowed to reach them.
Let’s verify these Security Groups before moving forward.
It may seem like a small step, but almost every AWS project eventually runs into a networking issue. Having the correct Security Groups from the beginning makes the rest of the setup much smoother.
Chapter 7 - Teaching Every Future Server What To Do
At this point, our networking is ready. The next step might seem obvious.
Launch an EC2 instance.
Install Python.
Copy the application.
Start the web server.
Job done.
But let’s think about what we’re trying to achieve.
The whole purpose of using an Auto Scaling Group is that AWS should be able to launch brand-new servers automatically whenever demand increases.
Now imagine it’s 2 AM.
Your application suddenly becomes popular and CPU utilization crosses the scaling threshold.
Auto Scaling immediately launches another EC2 instance.
Who’s going to log in to that server?
Who’s going to install Python?
Who’s going to create the application directory?
Who’s going to start the web server?
Hopefully, no one.
If every new EC2 instance still requires manual configuration, then we’ve only automated infrastructure creation, not infrastructure provisioning.
This is exactly why AWS provides EC2 User Data.
User Data is simply a shell script that runs automatically the very first time an EC2 instance starts.
You can think of it as a welcome checklist for every new server.
Instead of logging into every EC2 instance and repeating the same setup again and again, we write those commands once. Every future server launched from our Launch Template automatically executes the same instructions during boot.
This is one of those AWS features that feels small at first, but once you start using it, you’ll wonder how you ever managed servers manually.
Let’s create a Launch Template.
Navigate to EC2 → Launch Templates and choose Create Launch Template.
Provide a meaningful name, select the Ubuntu AMI you’re using for this project, choose the instance type and attach the backend application Security Group we created in the previous chapter. If you’d like to troubleshoot the instances later using SSH, don’t forget to select your Key Pair as well.
Now scroll down until you find the User Data section.
Paste the following script.
#!/bin/bash
mkdir -p /home/ubuntu/app
echo "<h1>Hello from Server 1</h1>" > /home/ubuntu/app/index.html
cd /home/ubuntu/app

sudo nohup python3 -m http.server 80 >/dev/null 2>&1 &
Let’s quickly understand what this script is doing.
It creates a directory for our application, generates a simple HTML page and starts Python’s built-in web server on port 80. We’re intentionally keeping the application simple because this guide is about AWS automation, not application deployment.
Every EC2 instance launched using this Launch Template will automatically execute these commands during its first boot. That means every new server is immediately ready to serve traffic without requiring anyone to log in.
With the Launch Template ready, creating the Auto Scaling Group becomes straightforward.
Navigate to EC2 → Auto Scaling Groups and create a new Auto Scaling Group using the Launch Template we just created.
For this demonstration, we’ll use the following values.
- Minimum Capacity: 1
- Desired Capacity: 1
- Maximum Capacity: 2
Next, configure a Target Tracking Scaling Policy using Average CPU Utilization.
We’ll use a target value of 20%. This makes it easy to generate CPU load later and observe Auto Scaling launching another EC2 instance during the demonstration.
Once the Auto Scaling Group finishes creating the first EC2 instance, wait until the instance reaches the InService state.
Before moving ahead, let’s perform one important verification.
Open the public IP address of the backend EC2 instance in your browser.
If everything has been configured correctly, you should see the message:
Hello from Server 1
This is one of those checkpoints we never skip during our DevOps training.
If the application isn’t working at this stage, don’t continue to the next chapter just yet. Every remaining component in this project assumes that Auto Scaling can successfully launch fully configured application servers. Spending a few extra minutes verifying this now can save you a lot of debugging later.
At this point, we’ve solved our first major problem.
AWS can now launch brand-new application servers automatically, and every new server already knows how to start the application without any manual intervention.
It sounds like we’re done.
Unfortunately, we’re only halfway there.
Auto Scaling knows about the new server.
AWS knows about the new server.
But HAProxy still has absolutely no idea that the server exists.
That’s the problem we’ll solve in the next chapter.
Chapter 8 - Great! Our Servers Can Scale... But Who Updates HAProxy?
At this point, we’ve solved one important challenge.
Whenever the application needs more computing power, the Auto Scaling Group can launch another EC2 instance automatically. Even better, every new server already knows how to start our application because of the User Data script we configured in the previous chapter.
Everything sounds perfect.
Or does it?
Let’s think about what actually happens after Auto Scaling launches a second EC2 instance.
The new server is running.
The application is running.
AWS knows about the new instance.
But HAProxy still doesn’t.
Remember, HAProxy is simply reading a configuration file. Unless someone updates that file, HAProxy will continue forwarding traffic only to the backend servers that were already listed there. From the user’s perspective, nothing has changed. The newly launched server is healthy, but it isn’t receiving a single request because HAProxy doesn’t know it exists.
This is exactly the problem we’re trying to solve.
Before we automate the configuration, let’s first deploy HAProxy and understand how it works.
Launch another Ubuntu EC2 instance that will act as our HAProxy server.
While creating the instance, place it in the same VPC and subnet as your backend application servers. Attach the HAProxy Security Group that we created earlier, and if you want to access the server using SSH during the lab, don’t forget to attach your Key Pair.
Once the server is running, connect to it and install HAProxy.
sudo apt update
sudo apt install haproxy -y
After the installation is complete, the main configuration file will be available at:
/etc/haproxy/haproxy.cfg
Let’s replace the default configuration with a very simple one.
global
    daemon

defaults
    mode http
    timeout connect 5s
    timeout client 30s
    timeout server 30s

frontend web
    bind *:80
    default_backend app

backend app
    balance roundrobin
    server app1 10.0.14.51:80 check
Don’t worry if this configuration looks unfamiliar.
Let’s understand it quickly.
The frontend section tells HAProxy to listen for incoming HTTP requests on port 80.
The backend section contains the list of application servers that should receive those requests. Right now, we have only one backend server, so every request will naturally be forwarded to that single EC2 instance.
The word roundrobin tells HAProxy how it should distribute requests when multiple backend servers become available. Since we currently have only one server, you won’t notice any difference yet. Later, when another EC2 instance joins the backend pool, HAProxy will automatically start distributing traffic between both servers.
After saving the configuration, let’s verify that it is valid before restarting HAProxy.
sudo haproxy -c -f /etc/haproxy/haproxy.cfg
If everything looks good, reload the service.
sudo systemctl reload haproxy
Now open the public IP address of the HAProxy server in your browser.
You should see:
Hello from Server 1
Congratulations!
We now have a working load balancer sitting in front of our application.
But let’s revisit the original problem.
If Auto Scaling launches another backend server tomorrow morning, will HAProxy magically update this configuration?
Unfortunately, no.
Someone still has to edit this file manually.
That’s exactly what we’re going to automate next.
Chapter 9 - We Need a Better Way Than SSH
Now that HAProxy is working, let’s imagine what our automation needs to do.
Suppose Auto Scaling launches another EC2 instance.
Our Lambda function discovers the new server and generates an updated HAProxy configuration file.
Sounds great.
But now comes the important question.
How does Lambda copy that configuration file to the HAProxy server?
The first idea that usually comes to mind is SSH.
We could generate an SSH key pair, store the private key securely, allow port 22 in the Security Group, connect to the server and execute the required commands remotely.
Technically, this would work.
But think about everything we would now need to manage.
SSH keys.
Security Group rules.
Credential rotation.
Network connectivity.
Key storage.
Bastion hosts.
For a simple automation task, this becomes unnecessary complexity.
Fortunately, AWS already provides a much cleaner solution.
It’s called AWS Systems Manager, or simply SSM.
One of the most useful features of Systems Manager is Run Command. Instead of logging into an EC2 instance yourself, you simply tell Systems Manager which command should be executed. AWS securely delivers that command to the Systems Manager Agent running inside the EC2 instance.
No SSH.
No private keys.
No bastion host.
Just IAM permissions.
Before we continue, we need to make sure the Systems Manager Agent is running on our HAProxy server.
On newer Ubuntu releases (such as Ubuntu 24.04 and 26.04), the SSM Agent is commonly installed as a Snap package. If you’re using one of these versions, the service name will usually be:
snap.amazon-ssm-agent.amazon-ssm-agent.service
Let’s verify its status.
sudo systemctl status snap.amazon-ssm-agent.amazon-ssm-agent.service
or
sudo systemctl status amazon-ssm-agent
If the service isn’t running, start it and enable it so that it starts automatically whenever the server boots.
Once the agent is running, there’s one more important step.
The EC2 instance itself must be allowed to communicate with AWS Systems Manager.
To do that, create an IAM Role for the HAProxy EC2 instance and attach the following managed policy.
AmazonSSMManagedInstanceCore
This policy allows the EC2 instance to register itself as a managed node inside Systems Manager.
Wait for a minute and then navigate to:
AWS Systems Manager → Fleet Manager
If everything has been configured correctly, your HAProxy EC2 instance should appear under Managed Nodes.
This is one of the most important checkpoints in the entire project.
If the instance doesn’t appear here, Lambda won’t be able to execute commands on it later.
Before introducing Lambda, let’s make sure Systems Manager is actually working.
Navigate to:
Systems Manager → Run Command
Choose the document:
AWS-RunShellScript
Select your HAProxy EC2 instance and execute a simple command.
hostname
Within a few seconds, you should receive the hostname of your EC2 instance.
Let’s try one more command.
cat /etc/haproxy/haproxy.cfg
If Systems Manager successfully displays the HAProxy configuration file, we’re ready for the next chapter.
During our DevOps workshops, this is another checkpoint we never skip. It’s much easier to troubleshoot Systems Manager now than after Lambda becomes part of the architecture.
Chapter 10 - Giving Our Infrastructure a Brain
So far, we’ve built every individual piece of the puzzle.
Our backend application is running.
Auto Scaling can launch new servers automatically.
HAProxy is distributing traffic.
Systems Manager can execute commands on our HAProxy server.
The only thing missing is intelligence.
Right now, all these services exist independently.
They aren’t talking to each other.
This is where AWS Lambda changes everything.
You can think of Lambda as the brain of our entire automation.
Whenever Lambda receives a notification that Auto Scaling has launched or terminated an EC2 instance, it immediately begins collecting information about the infrastructure.
Its first task is to contact the Auto Scaling Group and retrieve a list of every backend EC2 instance that currently belongs to the group.
Next, it communicates with Amazon EC2 and retrieves the private IP address of each instance.
Using those IP addresses, Lambda dynamically generates a brand-new HAProxy configuration file.
Finally, instead of connecting through SSH, Lambda uses AWS Systems Manager Run Command to execute shell commands on the HAProxy EC2 instance. Those commands replace the HAProxy configuration file, validate it and reload the HAProxy service.
All of this happens within a few seconds.
From the user’s perspective, the entire process is invisible.
Traffic simply starts flowing to the newly launched server.
Before creating the Lambda function, let’s create an IAM Role for it.
For this demonstration, we’ll keep the permissions simple by attaching the following AWS managed policies.
AmazonSSMFullAccess
AmazonEC2ReadOnlyAccess
AutoScalingReadOnlyAccess
AWSLambdaBasicExecutionRole
Each permission exists for a specific reason.
AmazonSSMFullAccess allows Lambda to execute Systems Manager Run Commands on our HAProxy server.
AmazonEC2ReadOnlyAccess allows Lambda to retrieve the private IP addresses of our backend EC2 instances.
AutoScalingReadOnlyAccess allows Lambda to query the Auto Scaling Group and discover which instances currently belong to it.
Finally, AWSLambdaBasicExecutionRole allows Lambda to write logs to Amazon CloudWatch, which makes debugging much easier whenever something goes wrong.
Every Lambda execution automatically writes logs to Amazon CloudWatch. During development, CloudWatch becomes your primary debugging tool because it lets you see every print statement, exception and API response generated by the Lambda function. If something isn’t working, CloudWatch Logs should usually be your first stop before looking elsewhere.
In a production environment, we would normally follow the principle of least privilege and create a custom IAM policy containing only the permissions required by our application. For a learning project, however, using AWS managed policies keeps the setup simple and allows us to focus on understanding the overall architecture.
Now create a new Lambda function using the Python runtime and attach the IAM Role we just created.
Instead of pasting small code snippets throughout the article, we’ll use one complete Lambda function that performs the entire workflow from start to finish. This makes it much easier to understand the complete automation process.
import boto3
import time

autoscaling = boto3.client("autoscaling")
ec2 = boto3.client("ec2")
ssm = boto3.client("ssm")

ASG_NAME = "lambda"
HAPROXY_INSTANCE = "i-0f67dcfc7d5bca612" #your haproxy ec2 instance id

def lambda_handler(event, context):

    # Get ASG details
    response = autoscaling.describe_auto_scaling_groups(
        AutoScalingGroupNames=[ASG_NAME]
    )

    if not response["AutoScalingGroups"]:
        return {
            "statusCode": 404,
            "body": "ASG not found"
        }

    # Get instance IDs
    instance_ids = [
        i["InstanceId"]
        for i in response["AutoScalingGroups"][0]["Instances"]
    ]

    # Get private IPs
    reservations = ec2.describe_instances(
        InstanceIds=instance_ids
    )["Reservations"]

    private_ips = []

    for reservation in reservations:
        for instance in reservation["Instances"]:
            private_ips.append(instance["PrivateIpAddress"])

    # Generate complete HAProxy config
    cfg = """global
    daemon

defaults
    mode http
    timeout connect 5s
    timeout client 30s
    timeout server 30s

frontend web
    bind *:80
    default_backend app

backend app
    balance roundrobin
"""

    for i, ip in enumerate(private_ips, start=1):
        cfg += f"    server app{i} {ip}:80 check\n"

    print(cfg)

    commands = [
        "cat > /etc/haproxy/haproxy.cfg << 'EOF'",
        cfg,
        "EOF",
        "haproxy -c -f /etc/haproxy/haproxy.cfg",
        "systemctl reload haproxy"
    ]

    response = ssm.send_command(
        InstanceIds=[HAPROXY_INSTANCE],
        DocumentName="AWS-RunShellScript",
        Parameters={
            "commands": commands
        }
    )

    command_id = response["Command"]["CommandId"]

    # Wait a few seconds so SSM can finish
    time.sleep(3)

    invocation = ssm.get_command_invocation(
        CommandId=command_id,
        InstanceId=HAPROXY_INSTANCE
    )

    return {
        "statusCode": 200,
        "private_ips": private_ips,
        "command_status": invocation["Status"],
        "command_output": invocation["StandardOutputContent"],
        "command_error": invocation["StandardErrorContent"]
    }
As you read through the code, don’t worry if every line isn’t immediately familiar.
Instead, try to understand the overall flow.
Lambda receives an event.
It discovers the backend servers.
It generates a fresh HAProxy configuration.
It asks Systems Manager to update the HAProxy server.
HAProxy reloads.
Automation complete.
If you’ve followed everything until this point, you’ve already built something that many engineers don’t get the opportunity to build during their first few years working with AWS. More importantly, you’re no longer looking at Lambda, Auto Scaling, Systems Manager and EC2 as separate AWS services. You’re starting to see them as individual building blocks that work together to solve a real operational problem.
Note: By default, AWS Lambda functions have a timeout of 3 seconds. Since this project waits for AWS Systems Manager to execute the Run Command and return the execution status, you may need to increase the Lambda timeout. We recommend setting it to 30 seconds for this demo.
You can change this by navigating to Lambda → Configuration → General Configuration → Edit → Timeout.
Chapter 11 - The Final Piece: Connecting Everything with EventBridge
We’ve come a long way.
Our backend application is running.
The Auto Scaling Group knows how to launch new EC2 instances.
HAProxy is forwarding traffic to our application.
Systems Manager can execute commands on the HAProxy server.
Lambda knows how to generate a fresh HAProxy configuration.
Everything works.
Well… almost.
Right now, there’s still one manual step remaining.
Every time Auto Scaling launches another EC2 instance, we need to open the Lambda console and click the Test button.
That completely defeats the purpose of automation.
The whole idea behind this project is that nobody should have to remember to run Lambda manually.
AWS already knows whenever Auto Scaling launches or terminates an EC2 instance.
So why don’t we simply ask AWS to notify Lambda automatically?
That’s exactly what Amazon EventBridge does.
Earlier in this guide, we introduced EventBridge as the messenger of our architecture. Now it’s finally time to put it to work.
Navigate to Amazon EventBridge and create a new rule.
Give the rule a meaningful name such as asg-scale-events. We’ll use the default Event Bus because our Auto Scaling events are already being published there.
Instead of creating a scheduled rule, choose Rule with an Event Pattern. This tells EventBridge that we want Lambda to execute only when a specific event occurs.
The event pattern should listen for successful Auto Scaling launches and terminations.
{
  "source": ["aws.autoscaling"],
  "detail-type": [
    "EC2 Instance Launch Successful",
    "EC2 Instance Terminate Successful"
  ],
  "detail": {
    "AutoScalingGroupName": ["lambda"]
  }
}
This small JSON document is actually one of the most important parts of our automation.
Instead of polling every few seconds to check whether a new EC2 instance exists, EventBridge simply waits. The moment Auto Scaling publishes one of these events, EventBridge immediately invokes our Lambda function.
No schedules.
No cron jobs.
No unnecessary API calls.
This is what event-driven architecture is all about.
As the final step, select our Lambda function as the target of the EventBridge rule and create it.
That’s it.
Our automation is now complete.
From this point onwards, nobody needs to remember to invoke Lambda manually. Every scaling event automatically starts the entire workflow.
One question we often receive during our AWS training sessions is whether EventBridge continuously consumes resources while waiting for events.
The answer is no.
EventBridge is a managed AWS service. It simply listens for matching events inside your AWS account and reacts when they occur. There’s nothing for us to install or maintain.
At this stage, our architecture has finally become truly event-driven.
Chapter 12 - Let's Test Our Automation
This is probably the most satisfying part of the entire project.
Until now, we’ve been building individual pieces of the puzzle. Now it’s time to see whether everything actually works together.
The easiest way to trigger Auto Scaling is by generating CPU load on the backend application server.
Connect to the backend EC2 instance and execute the following command.
yes > /dev/null &
If your EC2 instance has multiple vCPUs, run the command once per vCPU to generate enough CPU load for the Auto Scaling policy to trigger. Within a few minutes, CPU utilization should increase beyond the target value configured in our Auto Scaling policy.
Now comes the exciting part.
Instead of immediately opening the browser, let’s verify each step of the automation pipeline.
First, navigate to EC2 → Auto Scaling Groups and open the Activity tab.
You should see Auto Scaling launching another EC2 instance.
This confirms that our scaling policy is working correctly.
Next, open Amazon EventBridge and navigate to the rule we created earlier.
Under the monitoring section, you should see the number of matched events and successful invocations increasing.
This confirms that EventBridge has successfully detected the Auto Scaling event.
Now let’s open the Lambda function.
Navigate to Monitor → CloudWatch Logs and open the latest log stream.
If you’ve added a few debugging statements such as printing the discovered private IP addresses, you should now see Lambda discovering both backend servers and generating a fresh HAProxy configuration.
Our next checkpoint is Systems Manager.
Navigate to Systems Manager → Run Command → Command History.
You should see a successful AWS-RunShellScript execution.
This tells us that Lambda successfully asked Systems Manager to update the HAProxy configuration.
Finally, connect to the HAProxy server and open the configuration file.
cat /etc/haproxy/haproxy.cfg
Instead of a single backend server, you should now see both EC2 instances listed.
backend app
balance roundrobin
server app1 10.0.14.51:80 check
server app2 10.0.15.21:80 check
Everything looks good.
Now refresh the browser several times.
Instead of always seeing Hello from Server 1, you should notice traffic being distributed across both backend servers.
This is the moment where everything we’ve built comes together.
Auto Scaling launched a server.
EventBridge detected the event.
Lambda generated a configuration.
Systems Manager updated HAProxy.
HAProxy immediately started routing traffic to the new instance.
No SSH.
No manual configuration.
No human intervention.
This is exactly what event-driven automation looks like in AWS.
This is one of our favourite moments during live training sessions because learners finally see multiple AWS services working together instead of studying them individually. It’s also the point where many engineers realise that DevOps is less about learning tools and more about understanding how those tools solve real infrastructure problems.
Chapter 13 - Common Problems and How to Troubleshoot Them
One thing we’ve learned after teaching this project multiple times is that most issues are surprisingly small.
The good news is that AWS gives us excellent tools to identify exactly where the workflow is failing.
The first thing we recommend is avoiding the temptation to troubleshoot everything at once.
Instead, verify each component individually.
If Auto Scaling isn’t launching another EC2 instance, there’s no point debugging Lambda yet. Similarly, if Systems Manager isn’t working, Lambda won’t be able to update HAProxy regardless of how good the code is.
One of the most common issues is the backend application not starting automatically. In almost every case, the problem is inside the User Data script. Remember that User Data runs only during the first boot of an EC2 instance. Updating the script later won’t affect existing servers.
Another frequent issue is Security Groups. HAProxy communicates with backend servers on port 80, so make sure that the backend Security Group allows inbound traffic from the HAProxy Security Group. Opening port 80 to the entire internet might make testing easier, but it’s unnecessary for this architecture.
If your HAProxy server doesn’t appear inside Fleet Manager, don’t immediately start debugging Lambda. First verify that the Systems Manager Agent is running and that the EC2 instance has the AmazonSSMManagedInstanceCore IAM policy attached.
If Lambda isn’t discovering backend servers, double-check its IAM permissions. For this demonstration, we attached AmazonEC2ReadOnlyAccess, AutoScalingReadOnlyAccess, AmazonSSMFullAccess and AWSLambdaBasicExecutionRole. Missing even one of these permissions can prevent the workflow from completing successfully.
Another issue we occasionally see is EventBridge never invoking Lambda. In almost every case, the event pattern doesn’t match the Auto Scaling Group name or the wrong detail type has been selected. CloudWatch Logs and EventBridge monitoring are your best friends when debugging this part of the workflow.
The biggest lesson from this project is simple.
Don’t troubleshoot the entire architecture.
Troubleshoot one service at a time.
AWS provides excellent visibility into every component, and once you know where to look, most problems become much easier to solve.
One Thing to Remember
Learning AWS isn’t about memorizing what each service does.
The real skill is knowing when to use a service, why to use it and how different services work together to solve a business problem.
In this project, Auto Scaling launched new servers, EventBridge detected the change, Lambda made the decision, Systems Manager executed the commands and HAProxy immediately started routing traffic to the new backend instances. Individually, each service solved only a small part of the problem. Together, they created a complete automation workflow.
That’s exactly how modern DevOps works—and it’s the mindset you should carry into every project you build from here.
Chapter 14 - How Would We Improve This for Production?
Congratulations!
If you’ve reached this point, you’ve successfully built a complete event-driven automation project using multiple AWS services. Auto Scaling launches new EC2 instances, EventBridge detects scaling events, Lambda generates a fresh HAProxy configuration, Systems Manager updates the server and HAProxy immediately starts sending traffic to the new backend instances.
That’s a fantastic achievement.
But let’s ask ourselves an important question.
Would we deploy this exact solution in a production environment?
The answer is…
Probably not.
Not because the architecture is wrong, but because production systems usually require a few additional safeguards.
Let’s look at some improvements that experienced DevOps engineers would normally make.
The first improvement would be around IAM permissions.
For simplicity, we attached AWS managed policies like AmazonSSMFullAccess and AutoScalingReadOnlyAccess to our Lambda function. That makes the setup easier to understand, but in production we should always follow the Principle of Least Privilege. Instead of giving Lambda full access to Systems Manager, we would create a custom IAM policy that allows only the APIs required by this project.
Another improvement would be around the HAProxy configuration itself.
In our project, Lambda replaces the entire haproxy.cfg file every time Auto Scaling launches or terminates an instance. This works perfectly for a demonstration, but in production we would usually separate the static configuration from the dynamic backend server list. That makes the configuration easier to maintain and reduces the risk of accidentally overwriting unrelated settings.
One small improvement can also make the automation much safer.
Before reloading HAProxy, always validate the configuration.
haproxy -c -f /etc/haproxy/haproxy.cfg
If the configuration contains any syntax errors, don’t reload the service. It’s much better to continue serving traffic with the previous working configuration than to reload an invalid configuration and make the application unavailable.
Monitoring is another area that deserves attention.
In this guide, we focused on making the automation work, but in production we also want to know when something goes wrong. Services like Amazon CloudWatch, AWS X-Ray, Grafana or Prometheus can help us monitor Lambda executions, EC2 health, Auto Scaling activities and application availability. Good automation isn’t just about doing something automatically, it’s also about knowing when the automation fails.
Another improvement would be making HAProxy itself highly available.
In our demonstration, we deployed a single HAProxy server because it keeps the architecture simple and easy to understand. In a real production environment, that server becomes a single point of failure. Organizations usually deploy multiple HAProxy servers behind an AWS Network Load Balancer or use solutions like Keepalived with Virtual IP addresses to provide high availability.
One final improvement is infrastructure as code.
Throughout this guide, we created resources manually because our goal was to understand how each AWS service works. In production, we would almost certainly provision everything using Terraform, AWS CloudFormation or AWS CDK. Infrastructure as code makes deployments repeatable, version-controlled and much easier to maintain as environments grow.
The important thing to remember is that production readiness isn’t about making the architecture more complicated. It’s about making it more reliable, more secure and easier to maintain over time.
Chapter 15 - How to Showcase This Project
After spending several hours building this project, one question naturally comes up.
"How can we use this project to improve our career?"
The good news is that this isn’t just another AWS practice exercise.
This is a complete end-to-end automation project that demonstrates your understanding of multiple AWS services working together to solve a real infrastructure problem.
If you’re preparing your resume, don’t simply write:
AWS, Lambda, EC2, Auto Scaling.
Almost every AWS learner writes that.
Instead, describe what you actually built.
For example:
Designed and implemented an event-driven infrastructure automation solution using AWS Auto Scaling Groups, EventBridge, Lambda, Systems Manager and HAProxy to automatically discover backend EC2 instances, update HAProxy configuration and reload the service without manual intervention.
Notice the difference.
Instead of listing AWS services, you’re describing an engineering solution.
That’s exactly what interviewers like to hear.
The same advice applies to LinkedIn.
Rather than posting a screenshot of the AWS Console with the caption “Completed AWS Project”, tell the story behind the project.
Explain the problem.
Describe how Auto Scaling launches new EC2 instances but HAProxy doesn’t automatically discover them.
Then briefly explain how EventBridge, Lambda and Systems Manager solved that challenge.
Finally, include your architecture diagram and a short demo video or a few screenshots showing the automation in action.
Posts that explain why something was built almost always generate more meaningful engagement than posts that simply announce a certification or completed course.
If you’re attending interviews, be prepared for questions around this project.
Some common questions include:
- Why did you choose EventBridge instead of scheduling Lambda?
- Why did you use Systems Manager instead of SSH?
- What are the advantages of HAProxy over an AWS Application Load Balancer?
- How does Lambda discover newly launched EC2 instances?
- What IAM permissions does Lambda require?
- How would you improve this architecture for production?
- How would you make HAProxy highly available?
- What happens if the HAProxy configuration generated by Lambda is invalid?
- Why did you use private IP addresses instead of public IP addresses?
If you can confidently explain these concepts, you’ll demonstrate much more than AWS knowledge. You’ll demonstrate that you understand automation, infrastructure design and the reasoning behind architectural decisions.
This is exactly the type of project we encourage our learners to build because it combines multiple AWS services into a single workflow instead of teaching them individually.
Frequently Asked Questions (FAQ)
For many production applications running entirely on AWS, an Application Load Balancer is the recommended choice because AWS manages scaling, health checks and availability automatically.
In this project, we intentionally used HAProxy because many organizations still rely on self-managed reverse proxies due to legacy applications, hybrid cloud environments or custom routing requirements. More importantly, it helped us understand how to build an event-driven automation workflow using AWS services instead of depending on built-in integrations.
Although Lambda can theoretically connect to an EC2 instance using SSH, it requires SSH keys, open ports, credential management and additional security considerations.
AWS Systems Manager provides a much cleaner approach. It allows Lambda to execute shell commands securely on an EC2 instance using IAM permissions without exposing SSH to the internet. This reduces operational overhead and follows AWS best practices for remote administration.
Absolutely.
The overall architecture remains exactly the same.
Instead of generating an HAProxy configuration file, Lambda would generate an NGINX configuration, copy it to the server using AWS Systems Manager and reload the NGINX service. The event-driven workflow doesn’t change, the only difference is the reverse proxy software being used.
The overall architecture is production-friendly, but the implementation shown in this guide has been intentionally simplified to make learning easier.
For a production deployment, you would normally create custom IAM policies with least-privilege permissions, validate the HAProxy configuration before every reload, separate static and dynamic configuration files, deploy multiple HAProxy servers for high availability and provision the infrastructure using Infrastructure as Code tools such as Terraform or AWS CloudFormation.
Yes.
In fact, that’s how most production teams would deploy it.
Resources such as the VPC, Security Groups, Launch Template, Auto Scaling Group, IAM Roles, Lambda Function, EventBridge Rule and Systems Manager configuration can all be provisioned using Terraform. This makes the deployment repeatable, version-controlled and much easier to maintain as the infrastructure grows.
Conclusion
When we started this guide, our goal wasn’t to learn another AWS service.
Our goal was to solve a real operational problem.
Auto Scaling could launch new EC2 instances, but HAProxy had no way of discovering them automatically. Instead of relying on manual updates, we designed an event-driven workflow where every AWS service had a clear responsibility.
Auto Scaling created the infrastructure.
EventBridge detected the change.
Lambda made the decision.
Systems Manager executed the commands.
HAProxy immediately started routing traffic to the new backend servers.
Individually, none of these services solve the complete problem.
Together, they create a powerful automation workflow that can save engineers countless hours of manual effort.
More importantly, this project teaches an important lesson that goes far beyond AWS.
Real-world DevOps isn’t about knowing dozens of services.
It’s about understanding how different tools work together to solve business problems.
If you’ve followed this guide from beginning to end, you’ve built much more than an AWS project.
You’ve built a practical example of event-driven infrastructure automation that you can confidently showcase in your resume, discuss during interviews and use as the foundation for even more advanced projects.
- If you're exploring DevOps , Cloud or Site Reliability Engineering, keep building projects like this. Certifications help you learn the services, but projects help you understand how those services solve real engineering challenges.
And that’s the difference employers notice.
What's Next?
If you enjoyed building this project, don’t stop here.
Try extending it yourself. Replace HAProxy with NGINX, provision the infrastructure using Terraform, or integrate the entire deployment with a CI/CD pipeline. Every improvement will teach you something new and make the project even stronger.
If you enjoy learning through hands-on projects like this, that’s exactly how we teach at CodeKerdos. Our DevOps program focuses on building real-world projects instead of isolated service demos, so that you not only understand AWS services but also learn how to combine them to solve practical engineering problems.
About the Author
Debjyoti Maity is a Senior DevOps Engineer at Improving. He has extensive experience in Kubernetes, cloud infrastructure, observability, CI/CD, and production engineering. His current focus is on the intersection of DevOps and Agentic AI, helping engineers understand how AI-powered operational systems are transforming modern platform engineering and infrastructure operations.